
👋 This page was last updated ~2 years ago. Just so you know.
I try to avoid doing “meta” / “behind the scenes” stuff, because I usually feel like it has to be “earned”. How many YouTube channels are channels about making YouTube videos? Too many.
Regardless, because I’ve had the opportunity to make my own mistakes now for a few years (I started doing the video thing in earnest in 2019), and because I’ve recently made a few leaps in quality-of-life re: shooting and editing video, I thought I’d publish a few notes, if only for reference for my future self.
Where to buy stuff?
There’s no affiliate links in this entire article: it all links to the manufacturers’ websites or Wikipedia.
Amazon is as evil as they come, but they have a great “no questions asked” return policy.
However, whenever I can, I try to buy from elsewhere. For audio stuff, that’s often Thomann (they have a separate website for the Americas). For visual stuff, that’s often Miss Numerique, but that’s just for France.
You can find a list of local resellers on the manufacturers’ websites: sometimes, the slight inconvenience of going off-Amazon pays off in terms of, well, the knowledge you’re supporting a smaller outlet, but also a higher quality of service, advice, etc.
I bought one thing off of eBay and had a really negative experience, but that’s just me. There are things worth the money on AliExpress and similar Chinese websites, but you won’t find them unless you explicitly know what to look for: the good stuff looks exactly like the bad stuff.
For example, I grabbed these 2160p@30 HDMI capture sticks for 22.41EUR, and they work (they’re USB video class, no drivers needed):

About the money thing
AV (audio/video) is an expensive hobby.
Expect your “price sensitivities” to evolve over time. I think I’ve wasted more money trying to save money by getting the cheap, not-fit-for-purpose entry-level stuff, rather than just getting something that works.
But when I started out, I didn’t know what worked!
So that’s what I’m here to tell you.
You obviously shouldn’t follow my “current rig” blindly: I’ve assembled it over years, and video stuff is my passion project. I do other work on the side to fund it. It’s easier to stomach the end-of-year accounting if you think of it that way.
What I’m going for
It doesn’t really matter if you’re doing shorter, more frequent videos, that cover current event, new releases etc., if you’re going for longer essays, or something in the middle: you want to keep your workflow as simple as possible.
If you’re recording for YouTube, chances are, you’re doing everything yourself. It’s not a big production where other people prepare your stuff, you’ll have to do the research, write the script, edit the script, set up the camera, the lighting, the mic, do your own wardrobe and make-up (for me that mostly means putting on a shirt and doing my best at wrangling facial hair), then later do color grading, edit, do sound design, title design, etc. etc.
Making a YouTube video isn’t one job, it’s 15 jobs.
So unless you have the budget to hire 15 people, you want to keep things as streamlined as possible, and sometimes that means spending money on hardware or software that will, in the long run, save you a lot of time. Or simply prevent you from getting so frustrated with the whole thing that you give it up entirely.
So, for example, let’s say you get a nice DSLR or mirrorless camera (the kind of camera you think of if I say “Canon” or “Nikon”? Think wedding photographer), most of those will let you record video directly to an SD card.
SD cards have fairly good capacity these days: you can get 512 GB ones in the 100-150EUR price range. Of course, you’ll need to ensure it’s fast enough to support the bit rate your camera is outputting.

And that can totally work! Get yourself a tripod, and I mean a good tripod: as a rule of thumb, never cheap out on stuff that could kill expensive stuff, so no cheap tripods, no cheap mic arms, no cheap battery packs, etc.
Get yourself a tripod, put the camera on there, and you’re good to go!

Several downsides are immediately apparent with that approach though: for starters, due to some tax rules in some countries (possibly the US?) some cameras stop recording after 30 minutes. (If they didn’t, they’d be taxed differently and cost a lot more on import. Sorry I can’t be bothered to look it up right now, I’m info-dumping).
Ignoring that, the mic is crap. The mic on any given camera exists solely to let you know your audio encoder is working, or, I guess, for AV sync (but a good old-fashioned clap is better. “Auto align audio” functionality in editing software never worked for me).
But that’s somewhat solvable. You can grab a RODE VideoMic (~280EUR), now your mic isn’t as bad, problem solved.


Although… now your mic is powered. So not only do you have to remember to actually hit record on your camera before “acting”, you also have to remember to turn on your mic.
And you might be thinking “Amos, I’m not stupid, I can remember two things”. But that’s two of many things that mean redoing a shoot.
Some cameras have a screen that rotates around, so you can see it from the side kind of, but unless you buy a separate monitor, you have no way to check you’re actually in frame.
If you’re doing green screen, and you’re slightly off center, it’s not a huge issue: if your keying is good enough, you can just re-center yourself (emotionally, too).
But yeah, here’s a list of reasons I’ve had to reshoot over the past few years:
- The camera wasn’t on
- The external mic wasn’t on
- The external mic was on, but wasn’t being recorded properly
- The SD card ran out of space (classic!) so the back half of the recording dropped
- The recording stopped for some other miraculous reason
- The camera ran out of battery
- The mic ran out of battery
- The mic receiver ran out of battery
- The audio clipped (more on that latter)
- I was off frame
- There was something wrong with my appearance, on a “can’t take your eyes off of it” level. Whatever your thoughts on the final product, consider that the takes I threw away were worse.
- The tablet I use as teleprompter ran out of battery
- Construction started in the streets
- Someone is home early
- Someone will be home late (so I have to cook)
- A cat is feeling particularly vocal
- In the middle of shooting, something I said out loud sounded odd, so I took a minute to Google it, and it turns out the second half of the script is based on a factual error I made during research.
- There’s flickering (more on that later)
- There’s a background noise (fans, etc.) I didn’t notice and that I could remove, at great cost to the quality of the voice take.
I could go on.
The name of the game is simple: we’re trying to eliminate entire classes of problems.
Batteries run out? Use power adapters. Your camera only takes batteries? No it doesn’t: dummy batteries exist.

They’re battery-shaped blocks with a cable coming out, that goes into a power supply. Just don’t forget to turn off your camera when you’re done.
Microphones & mic arms
Some shotgun mics like the RODE NTG4+, (~250EUR) (no I’m not sponsored by RODE I just dig their stuff) can be powered both by battery (for nomad use) or USB-C cable: that’s ideal!

Some lavalier wireless transmitter/receiver packs like the RODE Wireless GO II are very good with reporting battery levels, and last hundreds of hours: just charge them before a shoot, if you run out of batteries, you probably need to recharge as a human, too.

(Also, they have backup recordings on the transmitter if the connection drops out. I would trust those with my life.)
But more to the point: if you’re doing a face cam (the topic of this article after all), why are you even looking at all that? Lav mics are great for the outdoors, or noisy environments where you need to get as close as possible to the chest to isolate individual voices from the overall noise (here’s a guide on how to mic up someone btw), but pointless if you’re sitting in your home office or garage.
Similarly, shotgun mics let you aim at a specific area, but they work best in outdoor/large spaces: a small room will have tons of reflections unless you treat it properly, which will make your budget big and round in record time (unless you go DIY, I won’t talk about that part much as it’s the one I explored the least).
Using the “right kind of hardware” will make a big difference than moving across price ranges, and that is, of course, a lesson I learned after buying the mid-range thing for every wrong kind of hardware.
For example, I recorded my early videos with a RODE NT1-A (~200EUR). Decent mic to slap in a homemade mic booth, but terrible when your entire room is mostly naked hard surfaces (walls, floor, ceiling, desks, screens, etc.). It will capture all the reflections, and let me tell you, that’s a hard one to fix in post. There’s de-reverb plug-ins (iZotope RX10 has one) but they absolutely murder the recording.
Remember: “garbage in, garbage out”. It’s much easier to not record crap in the first place, than to fix it later.
I eventually graduated to a RODE PodMic (~100EUR), still with XLR to a USB audio interface, half the price but with a “tight cardioid polar pattern offering superior room noise rejection”. What does this mean? It means you can get away with those naked flat surfaces a lot easier. Should you still slap a couch in the room where you record? Probably! YouTubers are not doing it for the aesthetic.

I still wasn’t happy with the sound quality I had with the PodMic, and I ended up making myself crazy over EQ (equalizer) settings in post, so I finally broke down and got the YouTuber mic, the Shure SM7B (~400EUR), along with a FetHead (which adds “clean gain”), and I used it with the quality USB audio interface I already had.

And you know what? It sounds perfect out of the box. It’s 4x as expensive as the PodMic, without counting the rest of the audio pipeline you need to make it sound proper, but… for the rest of my face-cam-in-home-office life, I will never have to worry about equalizing ever again.
So, again, it’s not just a trend that “those stupid YouTubers” follow: and I’m sure some folks are using theirs “incorrectly”. It’s just a really solid mic, and folks in the trade talk to one another and kinda ended up standardizing on it.
As far as mic arms go, after having a cheap knock-off break while I was on vacation, I went for the Rode PSA1 (~90EUR) and haven’t looked back. It clamps on your desk, I had to move it around a bunch of times to keep it off-frame, no issue at all (the metal handle you have to turn is a bit harsh on me poor fingers, but ah well).

Audio interfaces & 32-bit floating-point
If you’re used to microphones in the “voice call” context, you’re using to 3.5mm jack (aka mini-jack), or bluetooth.
None of that here. We’re talking either USB directly, or XLR.
A mic having a built-in USB interface could be a sign that it’s cheap (in a bad way), I’m thinking at Blue Yeti-style mics for example, but these days there’s excellent all-in-one packages, like the Rode NT1-5, that offer XLR (for when it’s one of many mics going into a mixer) and USB, with a “world-first 32-bit float digital output”.
What does that mean? That means you never have to worry about clipping ever again.
When recording audio, you can adjust the “gain” of your mic. If you set it too low, you’ll have to amplify in post, and you’ll amplify any background noise coming from the entire system with it.
Also, if it’s only using, say, 10% of the amplitude available, then you’re only using 10% of the precision available. For 16-bit integer sampling, instead of 65K different values, that’s 6K values.
But if you set the gain too high, that’s not good either. It only takes one plosive (“p”/“b” sounds etc.) or a little enthusiasm to exceed the range of values it can represent: the amplitude is more than 65536 (or 2**24 for 24-bit, etc.) and.. since there’s no way to represent that, it’s “clamped” at the max value, and what should be a nice wave peak is a flat edge instead.

That’s called “clipping”.
You can’t recover from that. Once that happens in recording, the take is ruined.
This is why professionals will often have backups: some productions will mic people up with two lavs, in case one fails.
Similarly, the RODE Wireless GO II allow recording stereo files, where the second channel is the exact same mic, but with -8/-12/-20dB gain.
That way, even if the first channel clips, for that portion of the audio, you can salvage the take by using the second channel. Precision will suffer, but it’s much better than the alternative.
Floating-point sample formats have been around for as long as we’ve been able to afford them (we did 8-bit PCM back in the days! I know, I’m the oldest 33-year-old you know), but mostly as an intermediate representation, as far as I can tell?
When producing a track, sometimes plug-ins can make the waveform a bit larger than expected, and sometimes it’s easier to just “scale it back down” to a reasonable amplitude before exporting, than to go mess with plug-in settings several stages earlier in the pipeline.
However, recording in 32-bit floating-point audio is relatively new, at least as far as “plugging a USB thing into your computer” goes. There’s been portable float32 recorders for a while, and I’m sure the real pros have their own product lines.
What this means for a mic like the NT1-5, is that you cannot mess up your gain setting. You can set it to whatever feels good, and if you got it slightly wrong in either direction, no big deal.
An IEEE-754 32-bit floating point has a 23-bit significand (which you, like me, may have known as “mantissa”), which is the long way of saying that it’s almost as good as 24-bit integer samples (unless the exponent goes to the extremes, which would make neighbor values very distant), and much better than 16-bit integer samples at any rate.
It also takes up more space, but the storage space for your audio tracks is really not a concern when you get into video.
The first USB audio interface I bought specifically for video-making was the Focusrite Scarlett 2i2 4th Gen, because it’s small, pretty, and also, famously, just good.


At this point you may wonder: were those past purchases mostly vibes-based?
Well, yeah! It’s all trial and error. You can spend days and nights reading reviews, you’ll always find reasons not to buy something. In the end, I usually went with someone’s recommendation, which makes me feel better about writing this article.
I recently migrated from the Scarlett to a Zoom UAC-232 specifically for 32-bit float support, for any mic that outputs XLR.

The way it works is actually really neat! They “simply” have two ADC (analog-digital converters) set to two different input gains, and they switch dynamically between the two to get the best low-floor-noise/no-clipping compromise.
The Zoom UAC-232 manual goes into details, should you be curious.
Note that after buying one of these, you still have to set up all the software properly, otherwise you’re still not safe from clipping. More on that later.
As far as “portable setups” go, I got a Zoom H4N Pro Black a while ago: I liked the versatility, very good built-in XY microphones, you can plug your lav mic in there, or use one or two of the XLR inputs.

But in practice I use it very little. I can imagine it being very useful for interviewing on-the-go if you don’t have something like the RODE Wireless Go, and to record live music sessions and sound effects.
For usage in a “home office to shoot a face cam” setting though, it’s not what you want. It takes a long time to boot up, and it’s another SD card and set of batteries to worry about.
You can use it as a USB audio interface, but at that point you’re tethered, just get a regular desktop one. I bought a power cable for it off of Amazon, but I’m honestly too scared to try it, so even with rechargeable AA batteries, it’s a hassle to use.

Going around with the H4N’s XY mics and studio headphones plugged in will never get old for me though: it’s like listening to the world with a different pair of ears.
Re: audio processing, I bought iZotope’s RX 10 Standard (439EUR now, I bought it when it was 33% off in 2022) and use their “Mouth de-click” and “De-plosive” plug-ins whenever needed.
The latter isn’t strictly needed if you take care of mic placement and/or make judicious use of a pop filter, but it will save the occasional sound explosion.
The “Mouth de-click” plug-in is amazing, though. It’s worth the price of the entire bundle. Dry mouth is a hard problem to fix: sometimes, no amount of apple juice will do, and although I haven’t smoked in 10 months now, however much that has improved my mouth noises has been ruined by a second 18-month round of orthodontics.
So. The sound processing will continue until oral health improves.
Studio headphones
I have the 250-ohm beyerdynamic DT 770 PRO, and I like them.

They’re neutral (important for mixing), comfortable enough to wear for long periods of time (also important), and they came highly recommended by friends who are better at mixing than I am, so that’s enough for me!
Before that, I had the classic (vintage?) Sennheiser HD-25 1-II.

You could do worse than the HD-25, and I like that almost everything is replaceable (I did replace the ear pads after many years of loyal service), but I wouldn’t buy them today unless I was on a very tight budget.
Before that, I made the mistake of mixing with some Logitech computer speakers: those are not studio speakers, they are extremely biased, what sounds good to you will not sound good to others (and of course, it depends a lot on how the room is set up).
In the past, I also mixed with some Sony wireless headphones (WH-1000XM3). Don’t. With Bluetooth, some editing software will compensate the delay (~200-400ms due to buffering), but only some time.

I went as far as uploading and publishing a video, and only noticing during the premiere (that I watched from a phone or a TV) that the audio and video were out of sync.
The WH-1000XMY family can also be used “plugged”, with mini-jack, but even then, they’re really biased, which isn’t surprised: they’re not trying to be studio headphones. Their noise-cancelling feature makes taking the subway bearable, but they’re not suitable for mixing work.
Cameras
When I started out, I had a DSLR lying around: a Canon EOS-550D, which was already old at that time (it came out in 2010!)


Although it could record at 1080p@30 (1920x1080 at 30 frames per second) direct to SD card, I rapidly looked into switching to a workflow where the camera was just a “sensor”, and didn’t take care of any audio processing, video compression, or storage.
Since I had started out with livestreaming on Twitch, I would’ve loved to just set everything up in OBS Studio, which, for all its shortcomings, is still the least worst recording software I’ve used.

So, naturally, I looked into webcams. I thought, maybe I just had shitty webcams all this time? Laptop webcams are crap, that’s a given: even the ones on MacBook Pro laptops are frankly insulting. And if you pay less than 50EUR for a USB camera well, you get what you didn’t pay for.
But it turns out, even if you throw 200EUR at a Logitech BRIO for example, that touts “4K” and “HDR” support, it’s still pretty bad!

Sure, because it has such a tiny lens and sensor, you’re never going to get the nice depth of field effect you could get on a “real” camera, but at some point, I realized the limiting factor was simply the video format / USB connection.
I was wondering how it was able to transfer 4K images at 30FPS over USB 2.0. I will surely come to regret this back-of-the-envelope calculation, but: it seems USB 2.0 has an effective throughput of around 35 MB/s. Assuming RGBX8888 (8 bit per red/green/blue channel, the fourth value is just zero, for alignment’s sake), one 3840x2160 image is around 32 MB.
You can fit one of them per second, but certainly not 30. And I checked, it’s not like the camera unlocks different output formats when plugged on a USB 3.0-capable port.
So, what do they do? H.264? Well, they used to, as part of a partnership with Skype, so you could do 1080p video calls on your shitty $300 laptop.
But they no longer do, and now if you add a Logitech Brio as an input to OBS, you’ll see the video format is… MJPEG!
I’ve included some comparative webcam footage in This is a video about video, and you can see that, even with the pricey one, the JPEG artifacts are just… bad. Which I guess you wouldn’t notice on your 8th Zoom call of the day, but in this house, we’re making art.

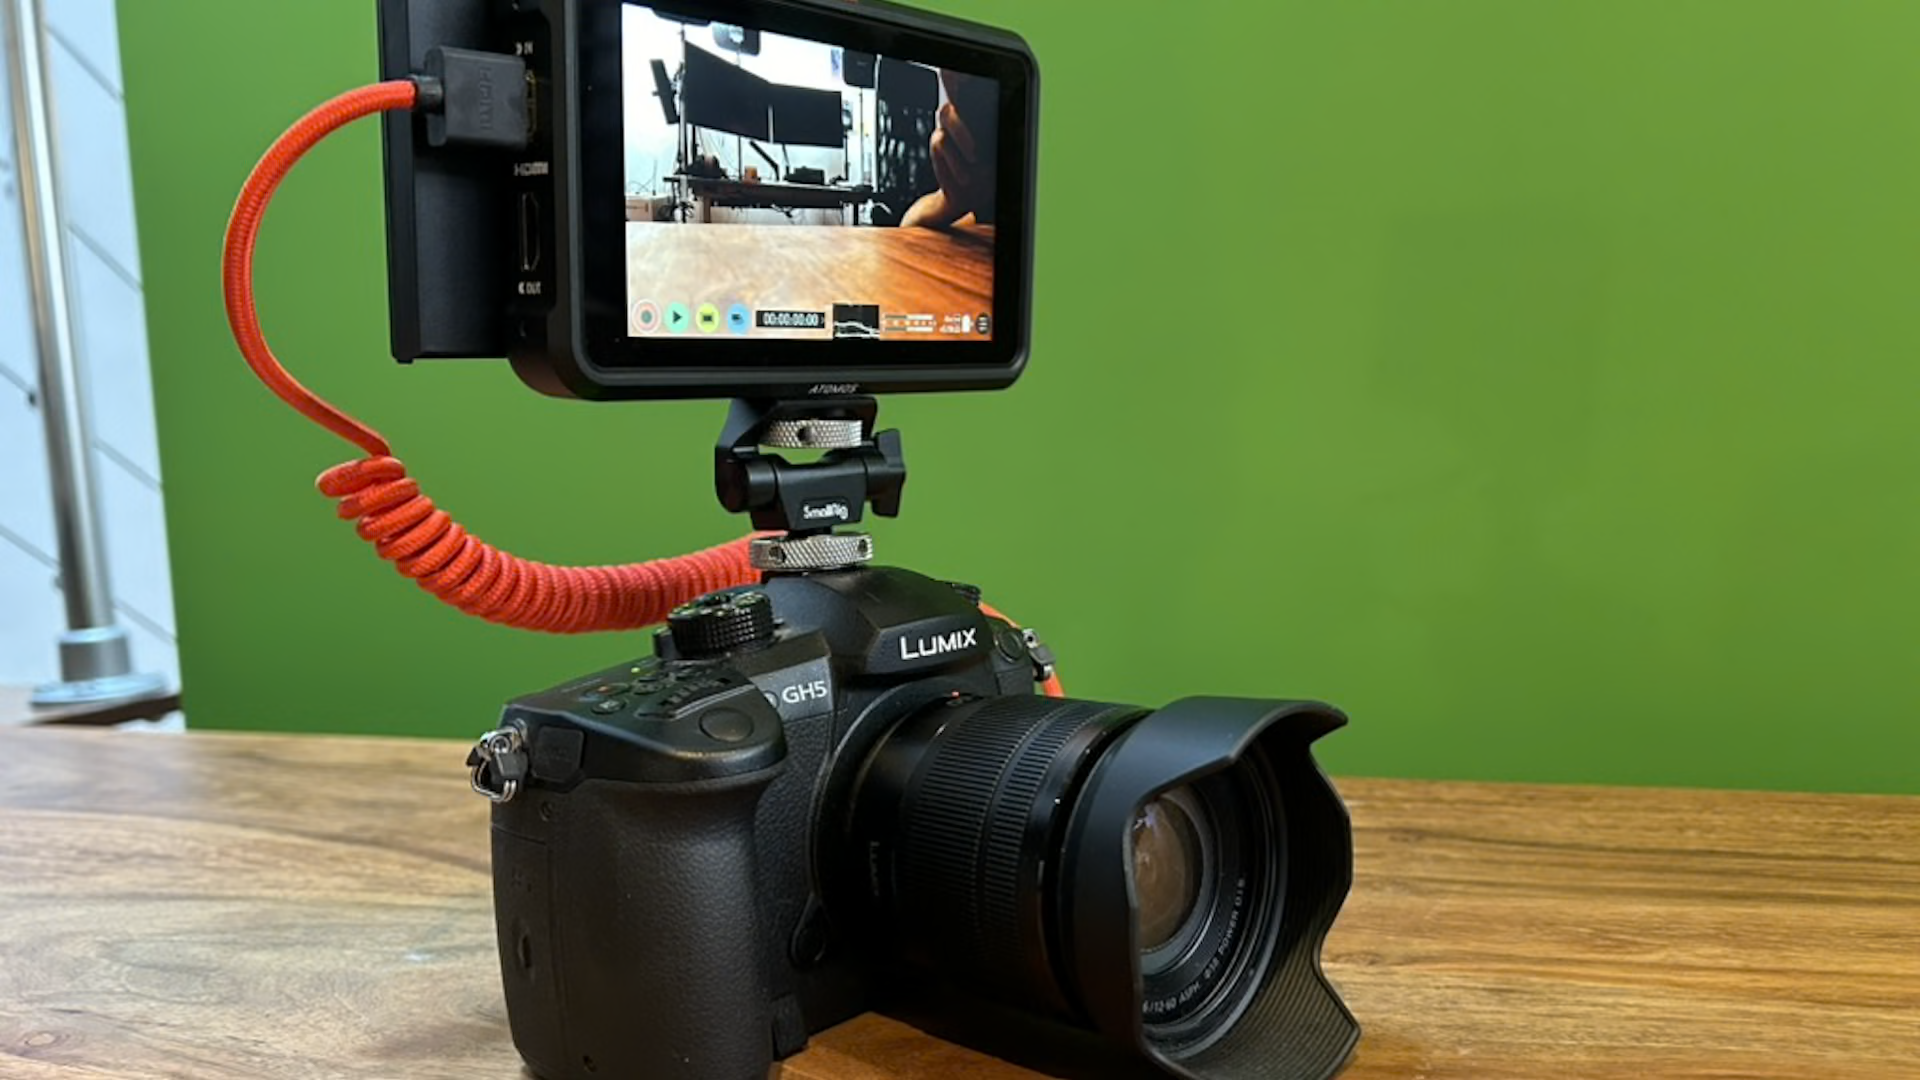
So, alright, proper camera it is. I got the Panasonic Lumix GH5M (1300 EUR at the time).
My criteria was: I want 4K60 support (3840x2160 at 60 frames per second), and I want “clean HDMI output”.
Why clean HDMI output? Because I’m only using the camera for its.. well, its lens, sensor and image processing pipeline, but then I don’t want to mess with popping SD cards in and out, painstakingly copying files to the computer, etc.
Some cameras have a “webcam mode” over USB, but it has the same limitations as USB webcams: the max resolution and frame rate are a far cry from what the camera is capable of.
HDMI capture cards
Since I wanted 4K60, I let myself be swayed by Elgato’s siren song. They do make some good stuff, we’ll come back to that. And honestly, the Elgato 4K60 Pro MK.2 (~250EUR) card looks great, and when it works, it works as advertised.

It needs a PCI-e 4x lane: after my graphics card, I only have one of those left, so I can’t set up a second capture card on there. It has one HDMI in and one HDMI out: I’ve never used the latter.

I’ve had multiple “no signal” problems that were usually solved by turning various parts of my setup on and off again, or going off to make coffee. Not great, but, once it started working, it didn’t stop working.
The one thing that made it really annoying to use the Elgato 4K60 Pro MK.2 for me was that I couldn’t quite use it in OBS for full-resolution recording. It just kept dropping frames for some reason?
It had been a while since I tried, so I thought maybe I was holding it wrong, but checking the comments on one of their guides reassured me that it’s still a problem for people today.
So, for the past few years, I’ve been using their own recording tool, the Elgato 4K Capture Utility.

I was happy enough with the quality, after cranking the bit rate all the way up to 140 Mbps (it doesn’t go any higher). Why such a high bit rate?

Because when you’re doing green screen, and you’re not lighting your scene properly (in real life), the green tones end up being lit unevenly and falling in the sort of “darker ranges” that get bit-crushed when encoding to H.264.
Video codecs are like image codecs with motion smarts added on top: they try to spend their bits wisely, where human eyes and minds will notice them. We don’t usually pay attention to the darker parts of a scene, the shadows, and so it simply has “fewer shades” there, resulting in banding-like artifacts that are noticeable when you look closely or post-process the image.
Much like for audio, it’s often desirable to capture in higher fidelity than your final render target: I did try recording in 10-bit to have a little more to work with, but nothing could save me from having to buy some proper freaking lights.
Plus, 10-bit color comes with its own pantry full of worm-cans. 10-bit is often interchangeably with “HDR”, except it’s very far from being that simple. There’s also 12-bit, some 10-bit displays are actually 8-bit but “changing values rapidly”, “HDR 400” is a lie but “DisplayHDR 400” isn’t, “HDR 10/10+” are confusing, Dolby Vision is fully proprietary…
“HDR” is the reason I bought an iPhone in the first place! (And then a proper TV). I researched it a bunch and started writing a whole script, even tried releasing a couple videos with it (like this health update). But as the rabbit hold got deeper, I… well, you haven’t seen any of it yet. But it’s on the back of my mind.
Notably, one thing about HDR is that it’s not just about having “more shades of colors”. Even in 8-bit, once you’re going through formats like H.264 (AVC for the pedants), chances are you’re doing chroma subsampling anyway.
Only 4:4:4 (e.g. I444) is “non-subsampled”, and nobody does that. You can technically tell OBS to do that, and it might be a good idea when recording screen capture, but once you upload it to YouTube, it will be served as YUV420P, which is 4:2:0, where you have a luminance (“grayscale”) sample for every pixel, but only one chrominance (“color”) sample per every four pixels.
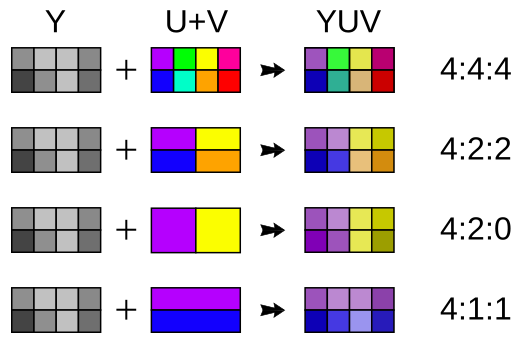
(Image credit: Stevo-88 on Wikimedia commons)
Back when I did a survey of HTML5 video support in web browsers (not documented anywhere, sadly), I think only Firefox on Windows 10 was able to play back 4:4:4 video properly.
It’s just one of those things you can’t unlearn to see: just like how different the blacks look on an OLED screen vs an affordable LED one.
Anyway, I gave up on HDR fairly quick because, as I said, it’s not just more shades, it’s also different colorspaces (Rec.2020 vs Rec.709 for HD SDR content, and let’s not talk about SD content).
In this context:
- HD = “high definition”
- SD = “standard definition”
- HDR = “high dynamic range”
- SDR = “standard dynamic range”
And it’s also different brightness standards: the brightest white on a properly calibrated HDR400 display isn’t “whatever I guess”, it’s 400 nits. On other, better displays, it’s 1000 nits.
My editing software shows me values of up to 4000 nits for Dolby Vision “Mastering displays”, and therein lies the problem: if you want to master HDR video, you need a display that costs an absolutely revolting amount of money.
Even if you do everything right, ideally you’d do a separate master for SDR (since most people do not have a good HDR display, or an HDR display at all, I try not to think of everyone watching on a shitty Dell Laptop), but YouTube doesn’t let you do that. It barely achieves HDR playback anywhere, and certainly not with consistent results, as others have documented extensively before me.
I might go back to 10-bit at some point, but only as a capture format: my target will be SDR for the foreseeable future, unless the landscape changes significantly. The reason I haven’t been using 10-bit as a capture format is because… my Elgato capture card simply refused to work when I set my camera to 10-bit output! How fun.
Since I’m always thinking of how portable my whole setup is, just in case I finally find a way to make my “travelling interviewer” dream job work, I started checking out portable recording devices, and eventually got an Atomos Ninja V (~600EUR).

Is this half the price of the camera? Yes. Is it worth it? Not for me, as it turns out: that thing gets CRAZY HOT and not only is the fan noise a no-go in a tight indoor environment, you have to hold the buttons 4 seconds to turn it off, and it physically hurt my fingers to do so after a recording session, since the whole thing was just boiling at that point.

But damn, what a cool piece of tech. The display does 1000-nit HDR, it’s full of neat features like showing overexposed areas, audio monitors (multiple inputs, too), there’s expansion packs to cast over Wi-Fi, it does many codecs (ProRes, DNxHR, H.264, H.265, etc. — some you have to pay once to unlock), and my favorite feature is that it doesn’t shoot to SD cards.
Ohhhh no.
It shoots straight to SATA 2.5“ SSDs.

You buy plastic caddies, that you mount SSDs into, and then you can just slide them in and out of the monitor. It’s… really fun!

Much like cameras have requirements for SD cards, the Atomos Ninja V does too for storage. In fact, there’s a specific list of SSDs it’ll work with. I had to wait a month for my “professional-grade” 960 GB SSD.
You can even mount it on a cold shoe (this means on top of your camera, sliding it into a slot made for this: “hot shoes” have electronic connections, to trigger flashes, external mics, etc. “cold shoes” are there just to physically hold stuff up), and I loved that!
Having a high quality 10-inch display to see if your shot actually looks good when you’re shooting solo is great. But I couldn’t use it in conjunction with my teleprompter, which goes all around the camera.
So, the heat, the noise, incompatibility with a teleprompter, means my Ninja V is sitting somewhere in my studio looking pretty, and I should look into selling it before it gets completely outdated.
While exploring my editing software’s interface deeper, I thought it could capture video directly, and I was really curious about that, because my “Elgato 4K Capture Utility” workflow was starting to get on my nerves: even when it did work, it worked my external mic as a separate .mp4 file.
The result was actually 3 mp4 files:
- One with the camera mic audio
- One with the external mic audio
- One with the video and both audio channels mixed together (no, not left/right)
And that makes perfect sense if you consider what the 4K60 Pro MK.2 is made for: capturing live gameplay footage. The files are even named (Game) and (Live Commentary).

What this meant though, was that I had to:
- Drag the “video.mp4” file onto my timeline
- Unlink the video & audio, delete the audio (which is a useless mixdown of two mics that are delayed with each other by up to 300ms!)
- Drag the “live commentary” file onto my timeline, aligned with the start of the video file
- Zoom wayyyy in, offset the audio by about 0.4s (scientific, I know), or, if I remembered to do a clap, move frame by frame to align the audio
- Link the video & audio so I can edit them as a single clip
- Trim the beginning & end of the linked clip (where there’s respectively, only video and only audio).
Imagine doing this for every take. I used to do a single take of even hour-long videos just to avoid having to do that over and over again. I know it sounds silly, but those things wear you down!
Anyway, DaVinci Resolve has a “Capture” panel in the “Media Library” tab, and I read something like, yeah, if you buy a BlackMagic capture card, you can control it from DaVinci Resolve.
So I bought the cheapest one that does the job: the BlackMagicDeckLink Mini Recorder 4K (~215EUR).

It has one HDMI input, and one 6G SDI input (first time I even hear about SDI!)
It took me a bit to get it set up (it needs drivers, too), and I couldn’t install it alongside the Elgato capture card, since it too needs a 4-lane slot.
And, to top it all off, I discovered that DaVinci Resolve (DvR) cannot actually record from a live source: it has two acquisition methods: the Cintel Film Scanner (…but I don’t shoot on 35mm film), or a video tape recorder (VTR).

You can control some VTRs from DvR and acquire video from them, but that’s not the replacement I was looking for.
However, after the disappointment faded, I discovered the card works beautifully in OBS, even in 2160p25, my new target. More on OBS later!
Lighting, frame rate & flickering
I got so mesmerized at the idea of “4K60 footage” (which makes your videos look like a soap opera by the way: it’s good for gameplay footage I suppose, but not worth much for face cams) that I forgot I lived in a PAL country.
To make a long story short: the frequency of alternating current is different depending on where you live. For me in France (and most of the world), it’s 50Hz. For the US and Japan, it’s 60Hz.
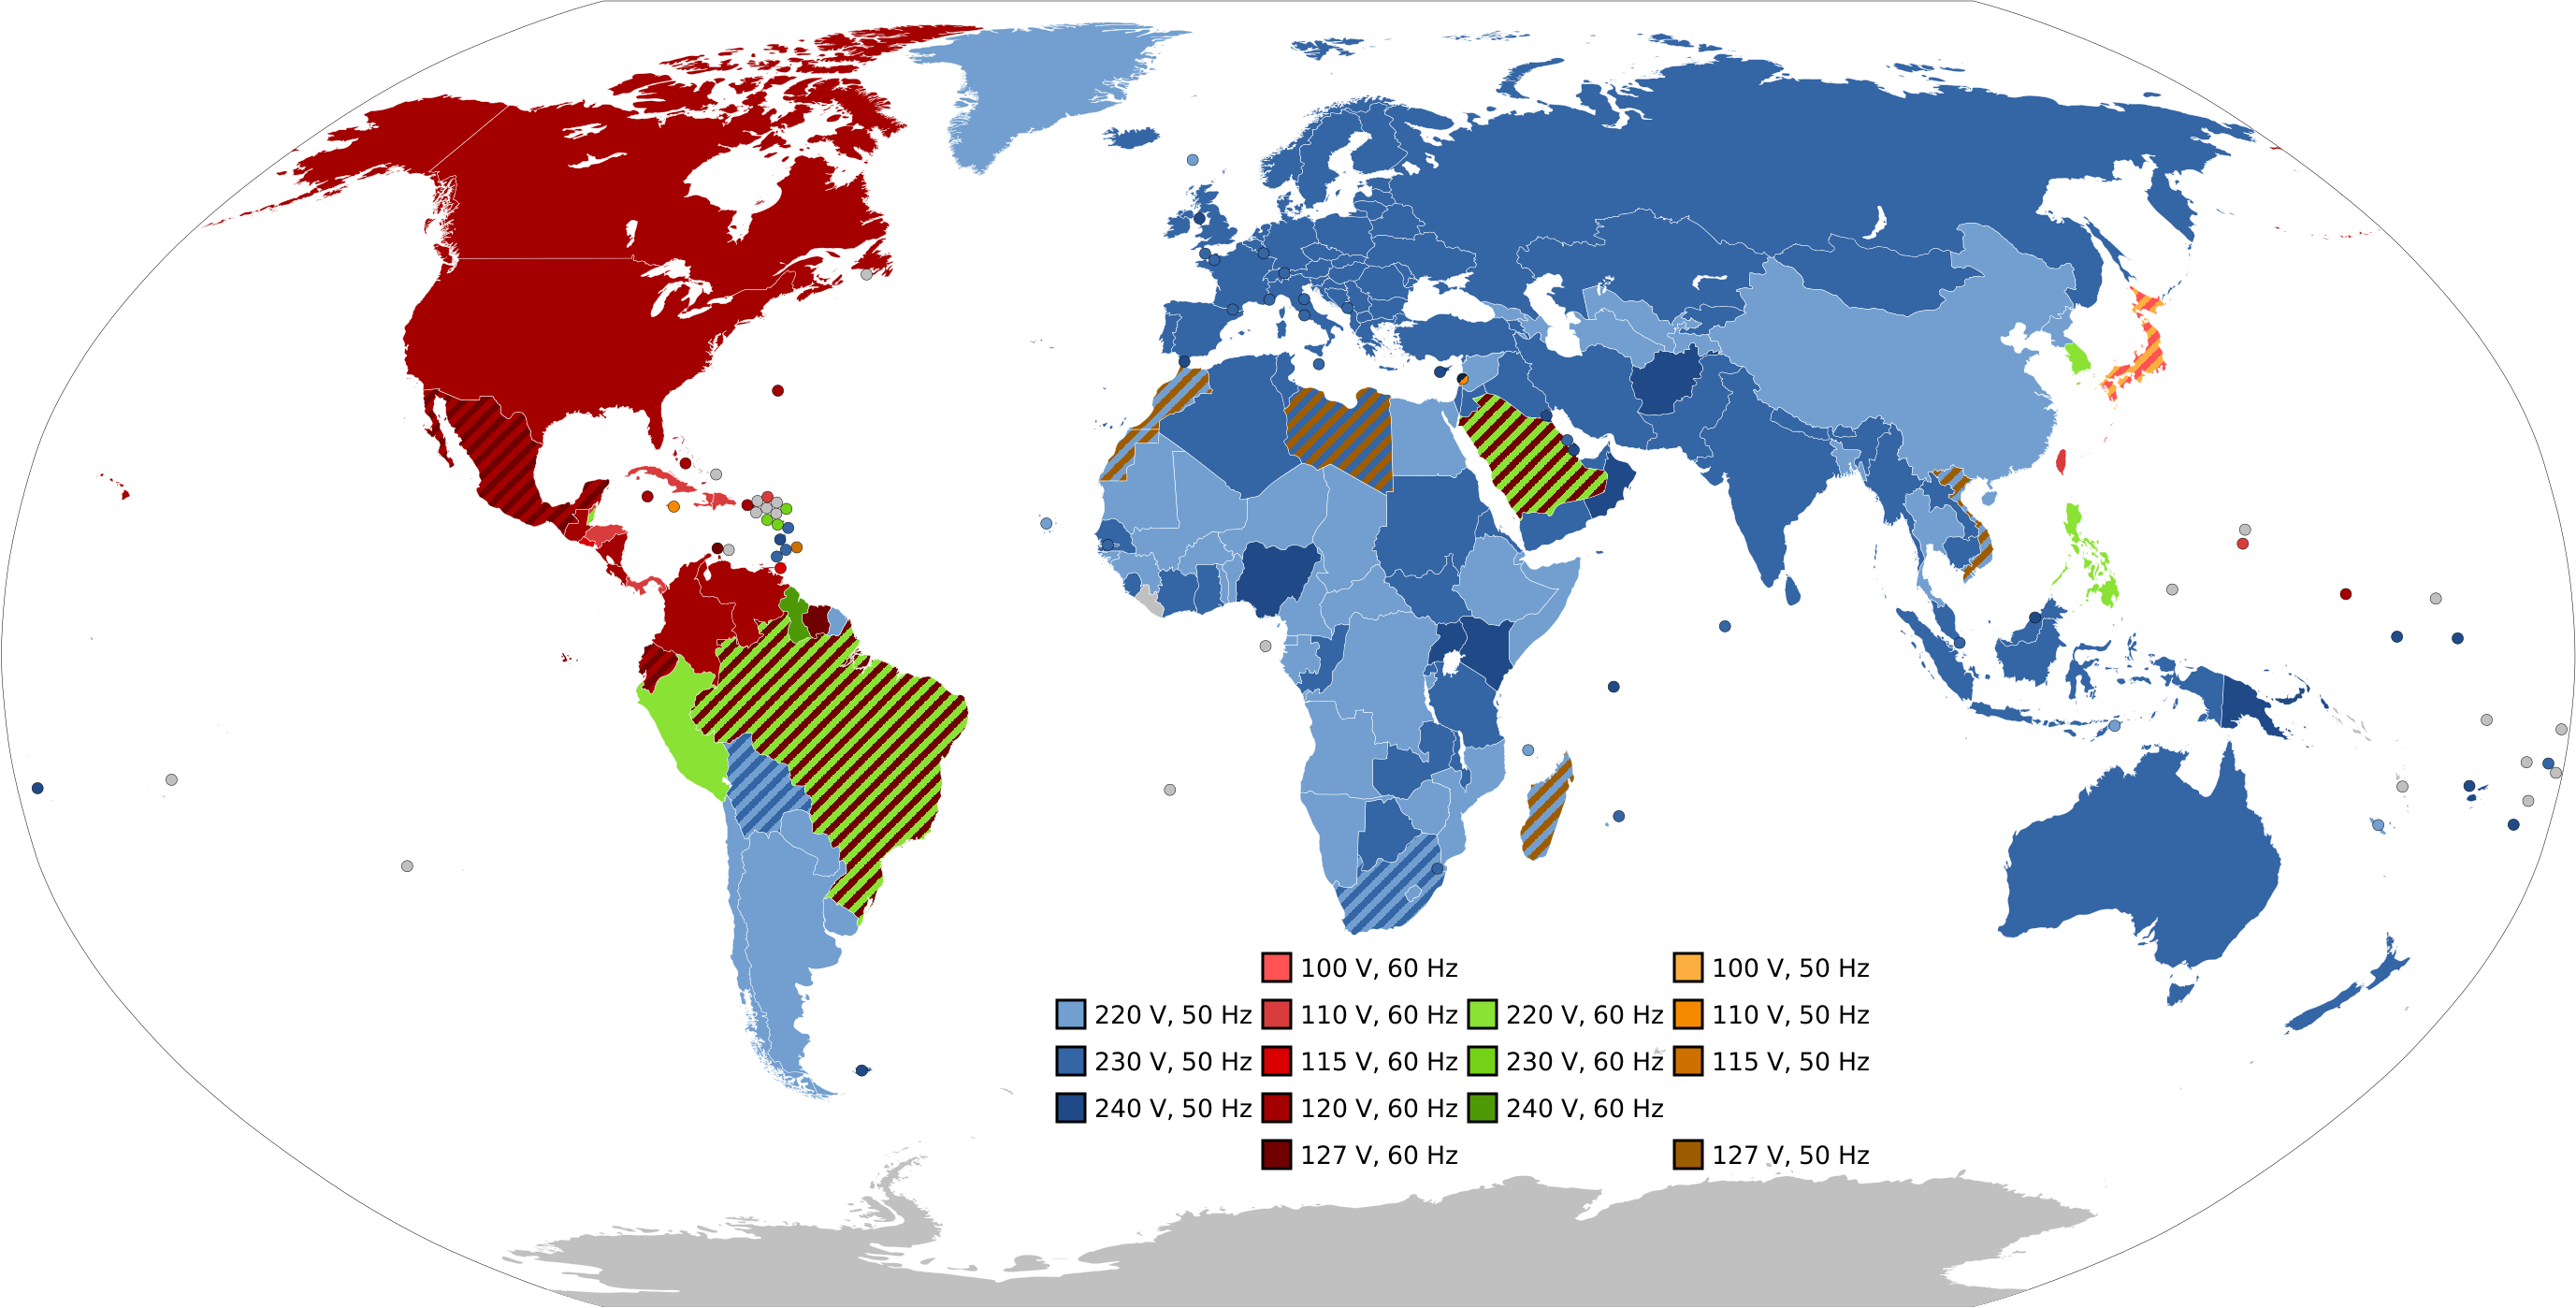
(Image credit: SomnusDe on Wikimedia Commons)
This determined early video standards, like PAL (50Hz) and NTSC (60Hz), because the video hardware was much simpler. This is why US/JP version of SNES games are faster, too. No framerate-independent game loop back then!
Today, my Panasonic Lumix DC-GH5 camera, for example, is able to switch its “system frequency” between 50Hz and 60Hz (which in turn determines which framerate it’ll output over HDMI). It’s not tied at all to the AC frequency because, well, it runs on a battery… and we have better clocks and chips nowadays? Someone else can make the “electrical engineer perspective” piece on this, I’m not the person for the job.
So then what’s the problem? It’s the lights!
Sunlight is an excellent light. But it varies throughout the day, so if you’re doing multiple indoor takes, it’ll look weird. If you’re doing green screen, you can’t rely on the sun being consistent.
Your ceiling light is, most likely, awful. Not only is it not enough light at all, but chances are, it flickers at the AC frequency (this happens with both LED lamps and more traditional bulbs).
I realized I didn’t have good lighting a few months in, and made several attempts to fix the problem. You don’t want one harsh spotlight when shooting a face, especially with green screen: you want a softer, more diffuse light.
Luckily, they make lights specifically for that, called “soft boxes”. I bought an affordable set of two LED soft boxes. I was happy with the light! Although I didn’t do any sort of measurements nor paid attention to the CRI (Color rendering index), it was a huge step up from whatever I was doing before.
However, it ran hot. And it had the nastiest little fan, that emitted the most irritating high-pitched hiss. Aggravating during the shoot, and an absolute pain to get rid of in post (no, a well-fitting EQ curve isn’t enough).
I later switched to another set of soft boxes with fluorescent lights: 5 bulbs per box, arranged in 3 groups (2-1-2), each with their separate switches, since fluorescent lightbulbs are not dimmable (or RGB, for that matter).
The best thing about these? They didn’t come with a fan! Finally, good light without a background noise!

However, they also ran hot, and shooting for even 15 minutes in that enclosed space (can’t crack open a window because, car traffic) became an issue because of sweat alone (not to mention exhaustion/dehydration).
The other issue? Those things are big. I couldn’t let them set up all the time, I simply did not have the space. So I had to assemble them before every shoot and disassemble them afterwards. That’s easily an added 20 minutes of set-up, and 10 minutes of tear-down.
Not exactly the “streamlined workflow” I’d been dreaming of! This killed any chance of a spontaneous video.
Eventually, I found my dream lights, the Elgato Key Light MK.2 (~180EUR).

I bought two (to light my green screen evenly) despite the price but was immediately rewarded with the build quality, complete absence of noise and quality of the life.

I can control them remotely from my phone and computers, adjusting the brightness and temperature (from a very warm-yellow-2900K to a very cold-blue-5000K).

I even hooked them up to Apple HomeKit via HomeBridge running on a Raspberry Pi Zero 2 W, since I use them as desk lights (turned back, facing the wall) when I’m not shooting.

They clamp to the desk, just like the mic arm (and the monitor arms I recently got, too), the height is adjustable with a pretty wide range, and you can adjust the direction any way you want.
They do weigh quite a bit: I accidentally let one loose while trying to adjust it, and it immediately rotated, slamming my finger between it and the arm/stand. That was months ago, my nail is still slowly growing, pushing out the dried blood towards freedom.

I now have a healthy fear/respect of these lights.
My only complaint was that they only supported 2.4GHz Wi-Fi, but the third one I bought came with 5GHz support: it looks like they did a silent upgrade! (It also supports Bluetooth remotes now apparently).
I now use three when shooting: two on either side to light the green screen properly, and one slightly off-center, to provide some highlights on my face.
It’s not perfect, but keying off the green screen is extremely easy, and I haven’t had to deal with artifacts in a long time.
These LED lights don’t flicker, but, there’s always a chance something I’m shooting will be on 50Hz or some multiple/fraction thereof.
I once had to edit 60Hz footage with lights flickering at 50Hz: the whole image was really, really hard to look at. I was able to salvage it with DaVinci Resolve’s De-Flicker plug-in, which made the export 20x longer than usual.
I spent a lot of time learning about my camera’s anti-flicker features, about shutter speed, etc. but you know what’s the best way to avoid flicker?
If you’re in a 60Hz country (USA, Japan): shoot at 60FPS or 30FPS (which are really 59.94 / 29.97, which are really an even more cursed fraction).
If you’re in a 50Hz country: shoot at 50FPS or 25FPS.
Since I don’t actually need a high framerate, I target 25FPS now. And that was another issue with the 4K Capture Utility: it only supports 60FPS or 30FPS, which in turn causes stuttering.
The DeckLink Mini Recorder 4K has no issue with a 25FPS input, thankfully!
Recording software
I already talked about it some, but: after some time away from it, I’m back to OBS. (Well, I will be starting with the next video).
Since I’ve been trying to get out of the house more, and since I got an M2 MacBook Pro that is actually pretty decent at running DaVinci Resolve, even with 4K footage, I’ve been trying to make it possible for me to switch between editing from my home workstation (Ryzen 5950X, 128GB RAM, RTX 3070) and editing from my MacBook.
This was pretty much as easy as getting a couple USB-A-to-SATA and USB-C-to-SATA adapters and re-using the pro-grade SSD I had bought for the Ninja V, and having good discipline re: media files.

DvR (DaVinci Resolve) too easily sprays files all across your C: drive, there’s a few settings you need to mess with if you want the media files to all end up in the same place (and proxies, and stills, and optimized media, etc.)
As for the project files themselves, I originally was doing “Export Project”
to end up with .dpr (DvR project) files on the SSD manually, but after trying
out BlackMagic Cloud, I realized: they’re just billing you $5/project/month for
Postgres.
And… for unrelated reasons, I happen to have a K8S cluster running somewhere, with existing postgres databases that are continuously backed up to object storage.
Long story short, I felt comfortable enough operating my own Postgres instance for this, and after locking it down to “my IPv4/IPv6 block”, it was all systems go!

Now, I just have to plug the SSD into the right computer, boot it up, and open the project from the “Network library”, and it all works (well, I have to re-locate the media files but that’s one step, and I could probably fix it with their path mappings feature: I’ll look into it later).

So, for this last video, because I was planning on being mobile, and maybe doing some editing from a co-working space, I figured I’d record directly onto the SSD, via the USB interface.
And you know what happened?
“Elgato 4K Capture Utility” silently dropped frames.
Not on every take, mind you, so I don’t think I was hitting any theoretical limit. I also don’t think anything else significant was running on the computer, but with Windows 11 it’s hard to tell.
But it dropped video frames (you can tell by stepping through the timeline frame by frame, some are duplicated) and it dropped audio frames: there’s straight up gaps in the waveform, which… yeesh.

So at this point, I feel fairly negative towards Elgato video stuff, and really positive towards their lights (which are apparently made by Corsair? Yes, the Memory company?). I also like their Green Screen.


Switching back to OBS has solved all my problems.
From the live scene to the camera to the HDMI output to the capture card to OBS, there’s delay. A lot more delay than there is between my mouth, the SM7B, the USB audio interface, WASAPI and OBS.
276 milliseconds, to be precise!

Hey, that’s ~7 frames at 25fps!
OBS can’t magically invent what video input is like 276 milliseconds into the future, but it can make other audio 276 milliseconds late…

…and the result is that the captured file is perfectly synchronized every time, ready to be dropped on the timeline.
Also, no extra audio channels: my mic is mono, I can configure the file to only have one audio channel, avoiding unnecessary storage and processing. The mic camera, I throw away completely: it’s not even useful for sync, especially now that the sync is perfect all the time.
OBS has a “health” meter at the bottom that would show dropped frames if there were any (+ the logs show overall stats).
It supports hardware encoding via NVENC, both H.264 and H.265 (and AV1 for newer cards), whereas Elgato 4K Capture Utility insisted on H.264.
At first, I loved 4K Capture Utility because footage captured with it was smooth to “scrub through” (rapidly move the player head with the mouse) in DvR.
But it turns out, if you just lower OBS’s keyframe interval setting to as low as it will go (1 second), things are much better! Even with H.265!
Another thing that made me really sad with 4K Capture Utility was the complete lack of support for 32-bit floating point audio, making my nice ZOOM UAC-232 interface pretty useless, except when recording directly with Ableton Live (which I did on occasion, separately, then assembled the video & audio later).
Well, if you pick MOV or MKV as a container format (but don’t pick MKV, because DvR support for it isn’t great), you can pick “FFmpeg PCM (32-bit float)”.


However, that doesn’t do what you want it to do.
OBS uses 32-bit float internally, and it will render as 32-bit float PCM (you
can check with ffprobe, you should see pcm_f32le (fl32 / some hex)), but the
issue is that, as far as I can tell, with WASAPI (the modern Windows Audio API),
in shared mode, there’s no way to ask for 32-bit float.<
0 Comments
Log in to join the conversation.No comments yet. Be the first to share your thoughts.