
モダンなウェブ開発は非常に強力になりました。しかし同時に複雑さも増しています。
多くのプロジェクトでは、1ページを書く前に数百メガバイトの依存関係をインストールすることから始まります。フレームワーク、バンドラー、ルーター、テンプレートシステム、CSSツール、ランタイムライブラリはすべて重要な問題を解決しますが、追加の複雑さももたらします。
私は別の方法を求めました。
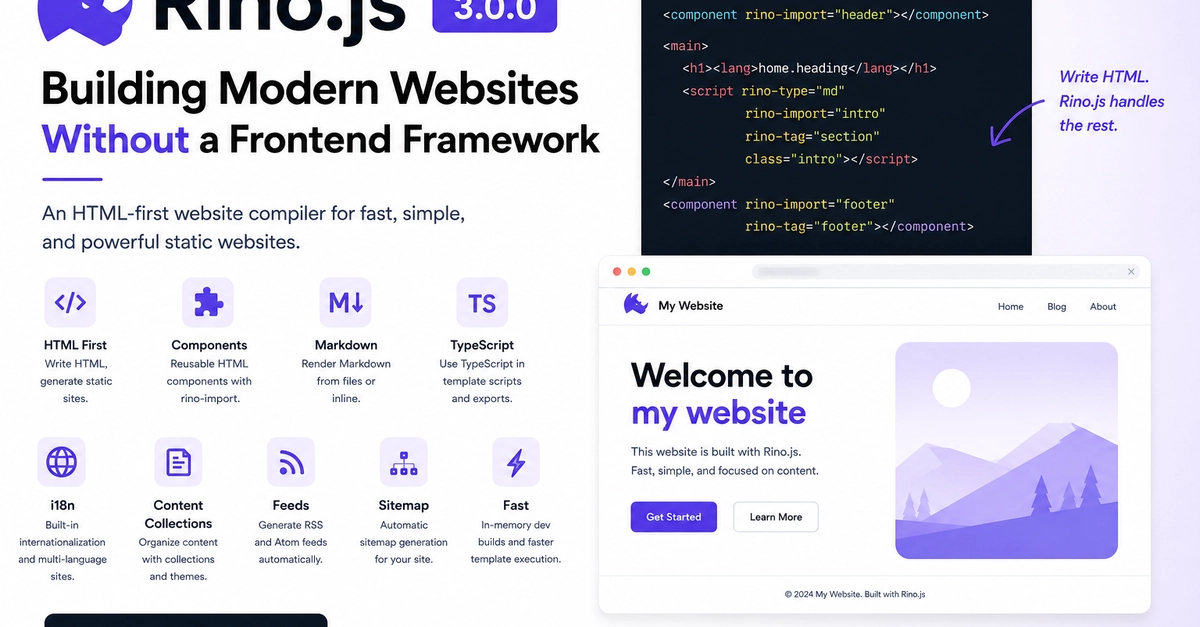
私は、プレーンなHTMLから始まりながら、今日の開発者が期待する機能を提供するウェブサイトを構築したいと考えました:
- 再利用可能なコンポーネント
- Markdownサポート
- TypeScript
- CSSおよびJavaScriptのバンドル
- 国際化(i18n)
- コンテンツコレクション
- RSS/Atomフィード
- サイトマップ生成
- 高速な開発ビルド
そのアイデアがRino.jsになりました。
Rino.jsとは?
Rino.jsは、静的ウェブサイト、ドキュメント、ブログ、ポートフォリオ、企業サイト、その他のコンテンツ駆動型プロジェクトを構築するためのHTMLファーストのウェブサイトコンパイラです。
Rino.jsは、カスタムテンプレート言語を導入したり、フロントエンドフレームワークを必要としたりする代わりに、HTMLを主要な言語として扱います。ページは有効なHTMLのまま、ビルド時の少数の規約を通じて追加機能が追加されます。
目標はシンプルです:
HTMLを書く。最適化された静的ウェブサイトを生成する。
なぜHTMLファーストなのか?
HTMLは何十年も存在していますが、モダンなウェブ開発ではしばしば別の言語によって生成されるものとして扱われます。
Rino.jsは逆のアプローチを取ります。
JSXや別のテンプレート言語でコンポーネントを書く代わりに、コンポーネントは単なるHTMLファイルです。
<component rino-import="header"></component>
Enter fullscreen mode Exit fullscreen mode
これだけです。
コンパイラはビルド中にコンポーネントを置き換え、ランタイム依存関係のないプレーンな静的HTMLを生成します。
Rino.jsを始める
Rino.jsには、デフォルトのプロジェクトを提供するために設計されたコマンドがあります。
npm create rino@latest
Enter fullscreen mode Exit fullscreen mode
プロジェクトの構造
Rino.jsプロジェクトは通常このようになります:
my-site/
  rino-config.js
  dev.js
  generate.js
  feed.js
  sitemap.js
  backoffice.js
  pages/
    index.html
    about.html
  components/
    header.html
    footer.html
  public/
    images/
      photo.webp
  scripts/
    export/
      app.js
      dashboard.ts
  styles/
    export/
      site.css
  mds/
    intro.md
  contents/
    en/
      blog/
        1-first-post.md
  content-theme/
    en/
      content.html
      content-list.html
  i18n/
    en/
      index.json
    ko/
      index.json
Enter fullscreen mode Exit fullscreen mode
必要なフォルダだけが必要です。小さな静的サイトの場合、pages/、components/、public/、scripts/export/、styles/export/で十分かもしれません。
設定
プロジェクトの設定はrino-config.jsにあります。
export default {
  dist: "./dist",
  port: 3000,
  site: {
    url: "https://example.com",
  },
  sitemap: ["https://example.com/custom-page"],
  i18n: {
    defaultLocale: "en",
    locales: ["en", "ko"],
  },
};
Enter fullscreen mode Exit fullscreen mode
distは出力フォルダを制御し、portは開発サーバーを制御し、site.urlはサイトマップとフィードに使用され、sitemapは追加のURLを追加し、i18nはローカライズされたページ生成を制御します。
ページ
pages/内のファイルは出力でHTMLファイルになります。
pages/index.html        -> dist/index.html
pages/about.html        -> dist/about.html
pages/blog/index.html   -> dist/blog/index.html
Enter fullscreen mode Exit fullscreen mode
ページはオプションのRino構文を含む通常のHTMLです:
<!doctype html>
<html>
  <head>
    <title><lang>site.title</lang></title>
    <link rel="stylesheet" href="/styles/site.css" />
    <script src="/scripts/app.js"></script>
  </head>
  <body>
    <component rino-import="header"></component>

    <main>
      <h1><lang>home.heading</lang></h1>
      <script rino-type="md" rino-import="intro" rino-tag="section"></script>
    </main>

    <component rino-import="footer" rino-tag="footer"></component>
  </body>
</html>
Enter fullscreen mode Exit fullscreen mode
コンポーネント
コンポーネントはcomponents/にあります。<component>を使って、ページや別のコンポーネント内にレンダリングします。
<component rino-import="header"></component>
Enter fullscreen mode Exit fullscreen mode
これにより以下が読み込まれます:
components/header.html
Enter fullscreen mode Exit fullscreen mode
ネストされたコンポーネントパスがサポートされています:
<component rino-import="layout/sidebar"></component>
Enter fullscreen mode Exit fullscreen mode
これにより以下が読み込まれます:
components/layout/sidebar.html
Enter fullscreen mode Exit fullscreen mode
コンポーネントの出力を要素でラップし、そのラッパーに属性を渡したい場合はrino-tagを使用します。
<component
  rino-import="button"
  rino-tag="button"
  type="button"
  class="button"
  onclick="alert('Hello')"
></component>
Enter fullscreen mode Exit fullscreen mode
components/button.htmlに以下が含まれている場合:
Click me
Enter fullscreen mode Exit fullscreen mode
生成されるHTMLは以下のようになります:
<button type="button" class="button" onclick="alert('Hello')">Click me</button>
Enter fullscreen mode Exit fullscreen mode
バージョン3では、rino-importを使用してください。古いrino-path構文はサポートされていません。
Markdown
Rino.jsはmds/からMarkdownスニペットをレンダリングできます。
mds/intro.md
Enter fullscreen mode Exit fullscreen mode
<script rino-type="md" rino-import="intro" rino-tag="section" class="intro"></script>
Enter fullscreen mode Exit fullscreen mode
これによりmds/intro.mdが<section>内にレンダリングされます。
Markdownをインラインで書くこともできます:
<script rino-type="markdown" rino-tag="article" type="text/markdown">
  ## Hello from Markdown

  This content is rendered during the build.
</script>
Enter fullscreen mode Exit fullscreen mode
サポートされているMarkdownタイプはmdとmarkdownです。
テンプレートスクリプト
テンプレートスクリプトは生成中に実行されます。console.logで生成されたページにHTMLを出力します。
JavaScriptテンプレートスクリプト:
<script rino-type="js" type="text/javascript">
  console.log("<ul>");
  for (const item of ["Home", "Blog", "About"]) {
    console.log(`<li>${item}</li>`);
  }
  console.log("</ul>");
</script>
Enter fullscreen mode Exit fullscreen mode
TypeScriptテンプレートスクリプト:
<script rino-type="ts" type="text/typescript">
  const message: string = "Generated with TypeScript";
  console.log(`<p>${message}</p>`);
</script>
Enter fullscreen mode Exit fullscreen mode
テンプレートスクリプトはNode.jsのインポートを使用できます:
<script rino-type="js" type="text/javascript">
  import os from "os";
  console.log(`<p>Built on ${os.type()}</p>`);
</script>
Enter fullscreen mode Exit fullscreen mode
バージョン3では、Rino.jsがすべてのテンプレートスクリプトタグごとに新しいプロセスを作成する代わりに、独立した子プロセスランナーを再利用するため、テンプレートの実行が高速化されています。
ブラウザスクリプト
ブラウザスクリプトは通常のブラウザJavaScriptです。ソースファイルをscripts/export/に置きます。
scripts/export/app.js -> dist/scripts/app.js
scripts/export/app.ts -> dist/scripts/app.js
Enter fullscreen mode Exit fullscreen mode
生成されたファイルをHTMLから参照します:
<script src="/scripts/app.js"></script>
Enter fullscreen mode Exit fullscreen mode
JavaScriptの例:
document.querySelector("button")?.addEventListener("click", () => {
  console.log("Clicked");
});
Enter fullscreen mode Exit fullscreen mode
TypeScriptの例:
const button = document.querySelector<HTMLButtonElement>("button");

button?.addEventListener("click", () => {
  console.log("Clicked with TypeScript");
});
Enter fullscreen mode Exit fullscreen mode
Rino.jsはスクリプトをバンドルし、出力を最小化します。最小化はファイルサイズを小さくするのに役立ちます。
CSS
CSSファイルをstyles/export/に置きます。
styles/export/site.css -> dist/styles/site.css
Enter fullscreen mode Exit fullscreen mode
@import "../theme.css";

body {
  font-family: system-ui, sans-serif;
}
Enter fullscreen mode Exit fullscreen mode
生成されたCSSを参照します:
<link rel="stylesheet" href="/styles/site.css" />
Enter fullscreen mode Exit fullscreen mode
Rino.jsはローカルCSSインポートを解決し、循環インポートをスキップし、URLインポートをスキップし、CSS出力を最小化します。
パブリックアセット
public/内のファイルは出力ルートにコピーされます。
public/favicon.ico       -> dist/favicon.ico
public/images/photo.webp -> dist/images/photo.webp
Enter fullscreen mode Exit fullscreen mode
ルート相対パスを使用します:
<img src="/images/photo.webp" alt="Photo" />
<link rel="icon" href="/favicon.ico" />
Enter fullscreen mode Exit fullscreen mode
インラインスタイル、JavaScript、TypeScriptのエクスポート
rino-exportを使用すると、ページやコンポーネントは、外部ファイルを生成しながらも関連するCSSとJavaScriptをHTMLの近くに保持できます。
エクスポートされたタグは最終的なHTMLから削除され、生成されたアセットに書き込まれます。
CSSエクスポート
<section class="callout">
  <h2>Hello</h2>
</section>

<style rino-export="/site.css">
  .callout {
    border: 1px solid #ddd;
    padding: 1rem;
  }
</style>
Enter fullscreen mode Exit fullscreen mode
これにより以下が書き込まれます:
dist/styles/site.css
Enter fullscreen mode Exit fullscreen mode
JavaScriptエクスポート
<script rino-export="/site.js">
  console.log("Exported browser script");

  window.openMenu = function () {
    document.body.classList.toggle("menu-open");
  };
</script>
Enter fullscreen mode Exit fullscreen mode
これにより以下が書き込まれます:
dist/scripts/site.js
Enter fullscreen mode Exit fullscreen mode
TypeScriptエクスポート
<script rino-export="/site.ts" type="text/typescript">
  const message: string = "Exported TypeScript";
  console.log(message);
</script>
Enter fullscreen mode Exit fullscreen mode
これによりJavaScriptが書き込まれます:
dist/scripts/site.js
Enter fullscreen mode Exit fullscreen mode
バンドル外のコードが関数を呼び出す必要がある場合は、windowにアタッチします。
<script rino-export="/site.ts" type="text/typescript">
  (window as any).testExportTypescript = function (): void {
    console.log("Called from outside");
  };
</script>
Enter fullscreen mode Exit fullscreen mode
次にHTMLから呼び出します:
<button onclick="window.testExportTypescript()">Run</button>
Enter fullscreen mode Exit fullscreen mode
複数のタグを同じファイルにエクスポートできます。Rino.jsは一意のブロックを追加し、完全に同一のブロックを無視します。
i18n
ページやコンポーネントで<lang>タグを使用します:
<h1><lang>name</lang></h1>
<p><lang>body.hero.copy</lang></p>
<p><lang>items[0].title</lang></p>
Enter fullscreen mode Exit fullscreen mode
i18n/{locale}/に一致するJSONファイルを作成します。
pages/index.html
i18n/en/index.json
i18n/ko/index.json
Enter fullscreen mode Exit fullscreen mode
i18n/en/index.jsonの例:
{
  "name": "Rino.js",
  "body": {
    "hero": {
      "copy": "Simple static websites from HTML."
    }
  },
  "items": [
    {
      "title": "First item"
    }
  ]
}
Enter fullscreen mode Exit fullscreen mode
デフォルトのロケールは通常のページパスで生成されます。他のロケールは、/ko/index.htmlなどのロケールプレフィックスの下に生成されます。
欠落したキーはビルドを中断する代わりにHTMLに残ります。リテラルの言語タグを保持するには、エスケープします:
\<lang>name\</lang>
Enter fullscreen mode Exit fullscreen mode
コンテンツコレクション
Rino.jsは、ブログなどのMarkdownコンテンツコレクションを構築できます。
contents/en/blog/1-first-post.md
Enter fullscreen mode Exit fullscreen mode
Markdownコンテンツは、HTMLコメント内のJSONメタデータで始めることができます:
<!--
{
  "title": "Welcome to the Blog",
  "time": "2026-07-29T00:00:00.000Z",
  "description": "The first post on our Rino.js blog."
}
-->

# Hello World

This is the first post.
Enter fullscreen mode Exit fullscreen mode
これにより以下が生成されます:
dist/contents/en/blog/1-first-post.html
Enter fullscreen mode Exit fullscreen mode
一致するテンプレートは以下にあります:
content-theme/en/content.html
Enter fullscreen mode Exit fullscreen mode
コンテンツテンプレートの例:
<!doctype html>
<html lang="en">
  <head>
    <title>{{ content.title }}</title>
  </head>
  <body>
    <main>
      <h1>{{ content.title }}</h1>
      <p>{{ content.time }}</p>
      <article>{{ content.body }}</article>
    </main>
  </body>
</html>
Enter fullscreen mode Exit fullscreen mode
メタデータと生成されたフィールドにアクセスできます:
{{ content.title }}
{{ content.description }}
{{ content.body }}
{{ content.urlPath }}
{{ content.nearby[0].title }}
Enter fullscreen mode Exit fullscreen mode
ループの場合は、テンプレートスクリプトを使用します:
<script rino-type="js" type="text/javascript">
  const args = process.argv;
  const content = JSON.parse(args[args.length - 1]);

  console.log("<ul>");
  for (const post of content.nearby || []) {
    console.log(`<li><a href="${post.link}">${post.title}</a></li>`);
  }
  console.log("</ul>");
</script>
Enter fullscreen mode Exit fullscreen mode
コンテンツリスト
コンテンツリストテンプレートは、コンテンツテンプレートの隣にあります:
content-theme/en/content-list.html
Enter fullscreen mode Exit fullscreen mode
Rino.jsは各カテゴリに対してページ分割されたリストページを作成します:
dist/contents-list/en/blog/blog-1.html
Enter fullscreen mode Exit fullscreen mode
例:
<ol>
  <script rino-type="js" type="text/javascript">
    const args = process.argv;
    const data = JSON.parse(args[args.length - 1]);

    for (const item of data.contentList) {
      console.log(`<li><a href="${item.link}">${item.title}</a></li>`);
    }
  </script>
</ol>
Enter fullscreen mode Exit fullscreen mode
利用可能なデータには以下が含まれます:
{{ contentList[0].title }}
{{ pagination.prevLink }}
{{ pagination.nextLink }}
Enter fullscreen mode Exit fullscreen mode
通常、配列をレンダリングするにはテンプレートスクリプトの方が良い選択肢です。
サイトマップとフィード
Rino.jsは、ページ、ローカライズされたページ、コンテンツページ、追加の設定URLからサイトマップを生成できます。
import { generateProjectSitemapFile } from "rinojs";
import config from "./rino-config.js";

await generateProjectSitemapFile(process.cwd(), config);
Enter fullscreen mode Exit fullscreen mode
また、contents/からRSSとAtomフィードを生成することもできます。
import { generateProjectFeedFiles } from "rinojs";
import config from "./rino-config.js";

await generateProjectFeedFiles(process.cwd(), config);
Enter fullscreen mode Exit fullscreen mode
典型的な出力:
dist/sitemap.xml
dist/rss.xml
dist/atom.xml
dist/rss-en.xml
dist/atom-en.xml
Enter fullscreen mode Exit fullscreen mode
私の目標
別のフロントエンドフレームワークを構築するのではなく、軽量なコンパイラでプレーンなHTMLがどこまでいけるかを探求したいと考えました。
その結果、HTMLを中心に据えながら、必要に応じて実用的なビルド時機能を追加するワークフローができました。
バージョン3は大きなマイルストーンですが、始まりに過ぎません。将来のリリースには多くのアイデアがあり、実世界の使用に基づいてプロジェクトを改善し続けることを楽しみにしています。
0 Comments
Log in to join the conversation.No comments yet. Be the first to share your thoughts.